surfPPC Tutorial No. 3
Bryce©

Use Bryce© to make amodel and render it twice, once with altitude render and once in perspective render.
Save it as a model, and two matching PICT files.
Use GraphicConverter© to convert the images to .BMP format
Use surfPPC© to open the color .BMP file.
Optionally open the altitude grayscale file as heights-only (shift-O).
To save disk space you can safely toss the PICT and BMP files because
(with some effort) they can be regenerated from the saved model.
There is a similar procedure for Carrara©.
Use Carrara© to make amodel and render it twice, once with altitude render and once in perspective render.
Save it as a model, and two matching PhotoShop© files.
Use GraphicConverter© or PhotoShop© to convert the image(s)
to .BMP format
Use surfPPC© to open the .BMP file.
Optionally open the altitude grayscale file as heights-only (shift-O).
To save disk space you can safely toss the PhotoShop and BMP files because
(with some effort) they can be regenerated from the saved model.
Examples
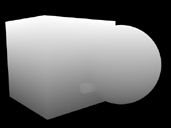
Make a model in Bryce© and save perspective rendering as PICT file No.1, convert this to BMP format.
1

The perspective BMP file used as input
Render altitude in a separate pass and save rendering as as a PICT file No.2, convert this to BMP format
2
The altitude BMP file used as input
Open surfPPC
Type b to set background to black or
open preferences with o
Open perspective render with o
Open altitude render with O
Space bar to render on a plane,
3 to render isometric,
A for autocontours, click in data area
tilde (~) to save offscreen
3
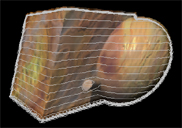
Rendered on a plane, normal view, auto contours
Note that here the 3D camera in the modelling program was deliberately placed
to the side of the model, and the auto contours verify that the top of the cube
is the highest.
It is only because we read two files of the same size with these commands in
this order, that the shape of the bas-relief is coming from the grayscale image,
while the colors on the surface are blended-in from the perspective render (based
on the fBlendBalance user preference settings). We "map" the color
onto the shape.
There is no particular reason the height information must come from a grayscale
image such as this example. A color image or DEM, BHFF file would work even
better, since they have more dynamic range and precision. It only has to be
the size, and to control only height, just be sure to read the color+height
information (o) first, then the height information
only (O) afterwards.
This trick enables us to color arbitrary DEMs with satellite photos, air photos
or our own paintings since we only need to know the dimensions of the DEM to
set up a matching color map image.